Sep 21, 2012

Like my new pot lights?? :)


Wait until you see my new front door.  And my new shutters, and my new roof, and my new painted portico and garage doors....ohhhhhhh.  My house is going to be the pimpest on the block.

It's all being done as we speak.... stay tuned!!

Sep 20, 2012

Office Reveal

~~Don't forget to sign up for email updates (on the right).  It'll let you know when I have a new post ~~

I know, I'm horrible.  I said James would get the next make over.  But, as many of you know, I am working on a little something new in my life, and need a place to study and get my work done.  So, I decided to invade Ryan's office.  Which means, it needs a make over.  I just can't work in an ugly space.

So here it was.  A few Before shots!  (The kids are playing with Ryan's $300 chess board... giggle)


 I know you love all that beautiful stained plywood, make shift, built in, wainscoting.   Worst. Molding. Ever.  Hummm, I'll just paint it.

And paint it, and paint it.  Took me 3 coats.  But it was worth it....
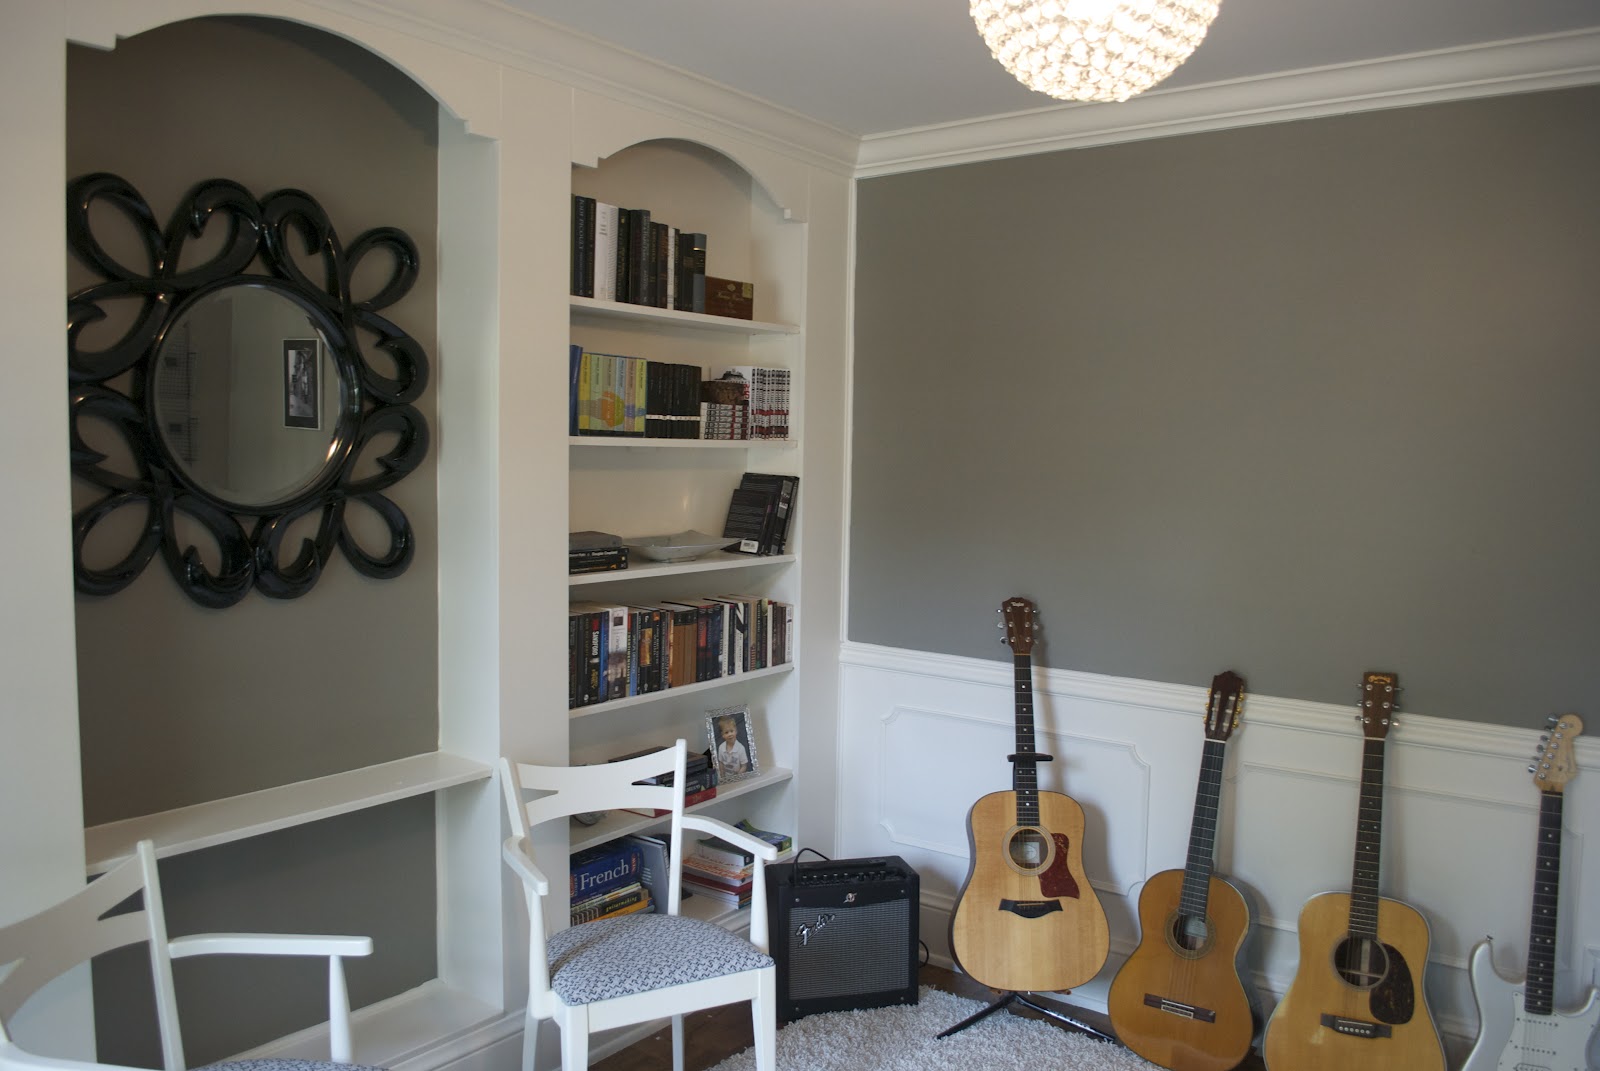
The AFTER pics...


After I finished the room, I felt bad for invading Ryan's space, and I decided to just give it to him.  I'll move my desk into the basement and hopefully he'll feel sorry for me and finish the basement  sooner than later.  wink!

Anyway, What do you think???  I love how it turned out.  Such a huge difference!  The Gray on the walls is Elephant Skin by Behr.  And the white is CIL Crisp Linen (but colour matched to Behr paint & primer).

Still have to fix the moldings around the window, but I'll do that in a while.  I have to re do the front door as well, so that'll be a project for the winter.  And, I think I'll make some faux roman shades.

Scored the light fixture from Home Sense for just $70 bucks.  That's also where I picked up the lacquered box and the file folder.

I'm planning on mounting the guitars along the wall.  That's a DIY project I'm tackling this week.

Hope you like it!

Linked up on:

shabby creek cottage
Fox Hollow Cottage

Sep 4, 2012

Plate make over!

Now that my electricians put new pot lights in my family room, it was looking dull and screaming for some attention.  I plan on painting it soon, but first I had to get it some new, fresh furniture.  I've been streaming kijiji and my local thrift shop for a new coffee table, but nothing has caught my eye (nothing within a reasonable amount of money any way...hello, it's kijiji, not some estate sale.  Hate that).  Anyway, I went to good 'ol ikea and bought the $39.99 lack coffee table.  I plan on hacking it some how in the near future.  But for now, it needed a little table top camouflage. 

I wanted to get a nice tray or something to put on top, but I am so damn cheap, I couldn't find anything.  Then, as I was tidying my "shop" in the basement, and I found this plate that my mom bought for me for my 2nd Burlington home way back on McCurdy crt.


Perfect size, perfect texture, but man, is it ugly!!! What were we thinking??

Poor plate just needed a little help.

So I coated it with some old beige paint I had from the farm.


Let it dry over night and then added 2 coats of my handy CIL Crisp Linen


Let that dry for about 6 hours and the attacked it with my Dremel tool.


I wish I had some crackle paint on hand, because I think that would have aged it a lot better, but it was a holiday and all the stores were closed.  And when I am feeling crafty, I'm feeling crafty.  No waiting and gatta work with what I have!!

I like how it turned out.  Can't wait to hack my coffee table.  Just have to think of a way to hack it. 


Sep 2, 2012

New Pot Lights & ATI Electric customer review

When we purchased this house, the wiring was half aluminum and half copper.  We thought, no biggie, we had it inspected and as long as it's safe, we can put off rewiring the place for a few years.  But, as we started replacing light fixtures, we came across a number of burnt wires in the ceiling and that was it.  We better get the wiring updated sooner than later.  Better safe than sorry.

So we hired ATI Electric based out of Burlington.  These guys have been amazing.  Very professional.  They have been in our house for over 2 weeks now, and I'm expecting them for another week.  It's always awkward when you have strangers in your home for days upon days, but having these guys around hasn't been bothersome at all.  They are respectful of my space, they clean up after themselves each night, and they communicate with me every morning.  Their work is detailed and meticulous. 

Check out my new pot lights....

Living room view 1

Living room view 2

Family room view 1

Family room view 2
We are also getting some new pot lights outside.  Ohhhhh, they are going to look amazing.  Can't wait until they are done!

All in all, a great experience with these guys and would recommend them in a heart beat!

Aug 30, 2012

Chair Make Over

Scooooores!!

Scored these awesome chairs at the Salvation Army a few weeks ago for just $7.50 a piece.  I had driven by the night before and saw 6 of them, but, stupidly waited until the next morning to go pick them up and only got 2.  'Tiss okay!  I am in love with the two I got!!!


Like my new "project" room?!?!?


I painted them with some left over CIL "Crisp Linen" and covered them with Ragg Tagg frabric from Tonic Living.


I'll be using these in the new office. Yea, sorry Ryan - no longer "Ryan's office".  It's now called "The Office".  I'm moving in!!

Linked Up to:
Happy Go Lucky

Aug 21, 2012

DIY Decorative Balls with Paint Chips

Sometimes I like to get a little crafty.  What can I say. 

I saw this post on Pinterest from Did Someone Say Party Site


And thought it would be a good way to get rid of some of my paint samples (I think I have over a thousand!!)  So, here's my version.


I bought some Styrofoam balls from Walmart for a buck and a Martha Stewart flower punch for about $10 bucks.  Busted out the massive collection of paint chips and went to town.


Start punching.  (Grace helped me)


Put 2 together and stuck in a pin. 


Then started decorating my balls.


And ta da


Aug 12, 2012

James's Room


James got lucky.  His room is next on the list.  I don't know why since not much in his room is bugging me.  I think I chose to do his room next because I have had this inspiration shot in my files forever, and I can't wait to execute it.

I believe I found this picture in a BHG magazine a few years ago and then tracked it down on line.  I've always been a fan of Navy and White, so here goes nothing.  The blue colour is called BLUE by Benjamin Moore, and I'll be using left over CIL Crisp Linen for the white.

I'm going to paint his tall boy dresser a light gray.  I got a quote from Paint It Like New in Burlington to have it sprayed.  It'll cost me $300, so I'm going to attempt to do it myself, and if it's horrible, I fork out the dough to have it done professionally.


I'm also going to be building his some cornices for the windows.  The windows are awkward since one goes right up against the wall.  Can't put panels, and I hate roman shades since they are difficult to pull up and down. 

So, I'll do cornices with white wood blinds.  Here are the fabrics I am considering.  Although I am sure I'll end up on Ottawa st. in Hamilton picking out something...
tonicliving.com

tonicliving.com
What else??? I'll be searching for some bedside tables to paint black and maybe a desk.  I've already got the bedding....

This is going to take a few weeks since we are getting our entire house rewired for the next 2 weeks.  All projects on hold until that's done.

:) CAIT