Aug 19, 2013

EASY DIY Envelope Pillow Cover

I'll admit I have ADD when it comes to home decor.  I'm constantly changing my mind when it comes to layouts, colours, fabric and blah blah blah.  I even annoy myself.

Remember my awesome toy room here.  Took me days to paint the stripes.... 


Well, this is what it looks like now.  Just 12 months later!!


I needed a work space, so I shafted the kids.  Sorry monkeys.
Anyway, the whole point to this story is that I wanted an easy DIY pillow cover pattern, so I could change up my pillows as often as I want.  I haven't busted out my sewing machine since we lived in this house, so I didn't want anything complicated.  So, here is what I came up with.  The world's easiest pillow cover for any dummy on a sewing machine.

First, grab your pillow insert and measure it.  Mine is 20"x20".  Lay it out on your fabric.


Measure and cut your fabric to be 2" longer than your insert on one side (22" for me!).  For the other side, double the length of your insert, and add 6" (For me, 20"x2"=40"+6"=46") See Ry,  I don't need Grade 12 math.


On the shorter sides, with an iron, press a .5" seam, then flip and press another .5" seam


Then bust out that dusty sewing machine and sew the hem.  Just a straight line.  You can do it.


Lay your fabric face up and place pillow in center


Fold the long sides, one after the other


Make sure the fabric is lined up on either side and fits snug around the pillow. Then, pin the two flaps of fabric together on either side


Slide the insert out and pin all the way down the sides

Now sew along the edges.  Once you are done sewing, turn the case inside out and slide your insert back in!
You're done!!


P.S. Like the bench?  Just redid it for my little princess and her crazy stuffie obsession.  


Aug 11, 2013

Coffee Table Re-do!

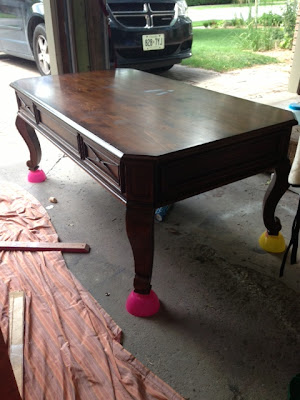
Not too long ago, my girlfriend asked me to keep my eye out for a coffee table for her living room.  I spotted this heavy sucker on kijiji for just $30 bucks and emailed her right away.
After a few coats of Annie Sloan's Paris Grey, this coffee table looks like it's worth a pretty penny, and looks amazing in her space!  Couldn't be happier!

Some before pics... (and I am so sorry for the poor pics.  Just got my new camera lens in the mail this week!)


And after!  I did 3 coats of Annie Sloan Paris Grey, 2 coats of wax, and minimal distressing along the detailed edges.


Aug 8, 2013

Next Project!

Check out the deal I got on Kijiji this week ;)  $50 BUCKS!!!

I've always wanted a hall tree but would never pay the $300 Pottery Barn charges


I'm thinking graphite with a glaze... or maybe just white.... I dunno.  I just love it!


Aug 5, 2013

Little Girls Room Complete!!!

This week, I had the pleasure of designing and installing a big-girl room for a very special 5 year old.  The pics below are of the completed project.  I sooooo enjoyed my weekend installing.  The house was dead quiet - no kids yelling 'mommy, mommy, mommy, mommy'.  No dogs under my feet and not a single interruption.  So therapeutic!!  My idea of perfect me-time!!!

Anyway, hope you like the room as much as I do.  The walls are painted Benjamin Moore Blue Bonnet and Sun Kissed Peach.  The dresser is a vintage piece from the 30s, painted a mix of Annie Sloan Old White and Paris Grey.  The bench, side table and chalk board are all painted Annie Sloan Scandinavian Pink.  "S" decal was custom made through isigns.ca.  Definitely recommend his company.  Great prices and great customer service!!

(my apologies for the junky pics!!  I only have my iphone right now.  New lens for the camera is in the mail!!)


Jul 24, 2013

For Little Miss "S"... fingers crossed she likes this one!

I had to sleep on it... The other 2 concepts just weren't screaming at me.  But this one does!!!!

The little girl's Mom mentioned an old vanity in her basement that was peach... the second I heard the word "Peach", I got inspired.  I love the look of Peach, Aqua and Coral.  Soooo pretty.

Hope she goes for it?!?!


Jul 23, 2013

For Little Miss "S"

I'll come up with a couple more ideas tomorrow... for right now, there is an ice cold MGD calling my name


Jul 21, 2013

Burlington Bungalow - Interior Ideas

Made a stop at the Burlington Bungalow this week.  The owners have moved in and decided to stay for a bit so they gave me a call to help them sort out the interior design.  They have quite a mish mash of styles in there, so I've come up with a few ideas to create a better flow.   We are trying to keep as much of their existing furniture as possible, and add just a few pieces.  I'm soooo looking forward to go shopping with them!  My most favourite part of the job!
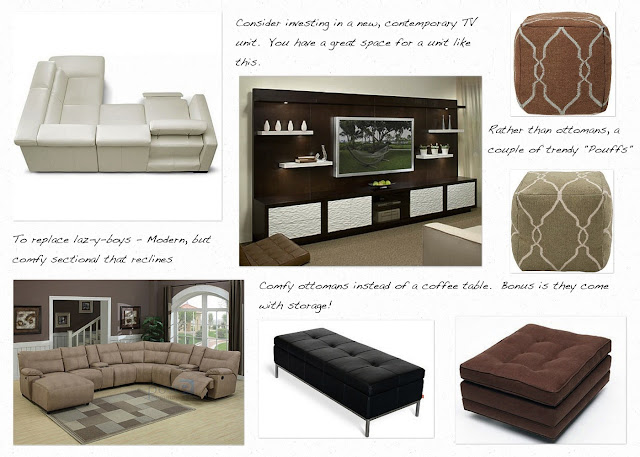
Thought I'd share.....


Jul 15, 2013

DIY Wall Projector


I've had these inspiration pictures in my files forever and have always wanted to do a hand painted tree on Grace's wall....


Problem is, there was no way I could hand draw a tree on a wall.  I needed an overhead projector to trace the image outline on the wall, and then I could free-hand paint it in.  Where on earth do I get an overhead projector?  I could buy one, but they are $300+.  No thanks.  I had some generous offers from some friends and family to borrow one from their office, but if you know me in the slightest, I want it NOW.  Can't wait until tomorrow, so I'll have to make-shift one.  

Turns out, I'm a genius and my make shift overhead projector, is now an awesome DIY that I want to share with everyone.

Step 1: Find an image you like, and print it out.  Here's mine!


Step 2:  Trace the image on a translucent sheet, using a black permanent marker.  I used a sharpie I had laying around.  For the paper you can use a plastic page protector (from the dollar store), or anything translucent you can think of.  I used a laminator page.  I just ran it through my laminator to make it clear.

Step 3:  Tape your page to a box that is open on either end and a suitable size for your page.


Step 4: Bust out your iPhone and download the flashlight app!!!  It just happens to be the perfect amount of light.  I tried a lamp without the lampshade, and it was too much.  The light needs to be tiny and bright.  I suppose a keychain type flashlight will work too, but let's face it, we all have these stupid phones.


Step 5: Set up your make-shift projector on a table, and project your image on the wall.  I had to prop my iPhone up with something - James's toy car was within reach.  Fiddle around with everything until you get your image just right on the wall.  (Don't forget to turn out the lights)


Step 6:  Trace your image with a piece of chalk.  It rubs off easy once complete.

Step 7: Paint!!!  I used acrylic craft paint and it took me about 4 coats to get it nice and thick.


See how smart I am???